
To master microphone technique, position the pop filter about 1-2 inches in front of your mouth, centered over your lips, to reduce plosives and moisture. Keep a consistent distance of about 6-12 inches, adjusting based on your vocal style to avoid muddy or dull sound. Slightly angle your head and mic to balance frequency and reduce plosive impact. Maintaining proper levels and angles is key—continue exploring these tips for a polished, natural sound.
Key Takeaways
- Maintain a 6-12 inch distance from the microphone, adjusting based on vocal style and mic sensitivity.
- Use a pop filter positioned 1-2 inches in front of your mouth, centered over the lips, to reduce plosives.
- Slightly angle your head or microphone to minimize plosive impact and balance sound.
- Regularly check audio levels and listen back to ensure consistent proximity and angle.
- Practice steady positioning with visual cues to prevent unwanted noise, distortion, and tonal inconsistencies.

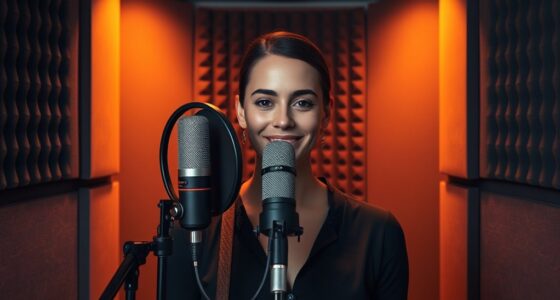
Mastering microphone technique is vital for capturing clear, balanced sound in any recording or live setting. One of the first steps is understanding how to properly position your pop filter and manage your vocal distance. The pop filter placement isn’t just about preventing plosives; it also influences the overall tone and clarity of your voice. You want the filter to be about an inch or two in front of your mouth, centered directly over your lips. This distance ensures that when you speak or sing, your breath doesn’t directly hit the microphone capsule, reducing unwanted popping sounds and protecting the mic from moisture damage. Proper pop filter placement also helps maintain consistent sound quality, as it acts as a barrier against sudden bursts of air that can cause distortion.
Proper pop filter placement prevents plosives and enhances vocal clarity.
Vocal distance management is equally vital for achieving a balanced sound. You should aim to stay roughly 6 to 12 inches from the microphone, adjusting based on your vocal style and the microphone’s sensitivity. Staying consistent in your distance prevents volume fluctuations and helps maintain a steady tonal quality. If you move too close, you might encounter exaggerated bass or “proximity effect,” which can muddy your sound. Conversely, pulling back too far can result in a dull or weak tone. The key is to find that sweet spot where your voice sounds full and natural without unwanted distortions. Use visual cues or marks on your stand to remind yourself to keep a consistent distance during recording or performance.
It’s also important to be mindful of your angle relative to the mic. Facing directly into the microphone can accentuate certain frequencies and increase the likelihood of plosives if you’re too close. Slightly angling your head or the mic itself can help reduce these issues and create a more pleasing sound. Additionally, always check your levels and listen back to recordings to verify your positioning. Small adjustments can make a significant difference in clarity, warmth, and overall quality.
In essence, effective microphone technique combines careful pop filter placement with vigilant vocal distance management. By maintaining the right distance and angle, you’ll minimize unwanted noise and distortions, capturing a clean, professional sound. Practice these fundamentals consistently, and you’ll notice your recordings become more polished and balanced, making your voice stand out with clarity and power. Remember, even in high-pressure situations like live performances or interviews, staying mindful of your microphone positioning can greatly improve your audio quality.
Top picks for "microphone technique proximity"
Open Amazon search results for this keyword.
As an affiliate, we earn on qualifying purchases.
Frequently Asked Questions
How Does Room Acoustics Affect Microphone Placement Effectiveness?
Room acoustics considerably impact your microphone placement by influencing reflections and overall sound clarity. When your space has excessive room reflections, you should position your mic closer to the source to minimize reverb. Acoustic treatment, like panels or diffusers, helps control reflections, making placement more effective. Proper placement ensures your voice or instrument sounds natural and clear, reducing unwanted echoes and improving the quality of your recordings or live sound.
What Are the Best Microphones for Live Vocal Recording?
For live vocal recording, you want microphones that master your melodic movements. Dynamic mics like the Shure SM58 and SM57 are superb for their durability and ability to handle high sound pressure levels, capturing vocal dynamics beautifully. Condenser mics such as the Audio-Technica AT4040 or Rode NT1 are also excellent, offering clarity and detail. Choose based on your performance style, venue environment, and the desired vocal presence to guarantee your voice shines through.
How Can I Prevent Microphone Feedback During Recording Sessions?
To prevent microphone feedback during recordings, you should focus on feedback suppression tools and proper microphone calibration. Use a feedback suppressor to automatically identify and reduce problematic frequencies. Additionally, calibrate your microphone levels carefully, ensuring they’re not too high, and position your microphone correctly to minimize room reflections. Keep monitor speakers away from the mic path, and consider using directional microphones to reduce the risk of feedback.
What Techniques Improve Clarity for Multiple Vocalists?
To improve clarity for multiple vocalists, focus on vocal blending and dynamic balancing. Adjust each performer’s microphone placement to guarantee even levels and avoid overpowering others. Use equalization to carve out space for each voice, reducing muddiness. Encourage singers to listen and adapt their volume, maintaining a balanced mix. Regularly monitor the sound to catch any imbalance early, creating a clear, cohesive vocal blend.
How Does Microphone Polar Pattern Impact Proximity Effect?
Imagine you’re recording vocals for a pop track. The polar pattern variation, like cardioid vs. omnidirectional, greatly impacts proximity effect control. Cardioid mics emphasize sound from the front, reducing bass boost when you’re close, while omnidirectional mics pick up more ambient sound and increase proximity effect. By choosing the right polar pattern, you can manage bass buildup without moving the mic farther away, ensuring clear, balanced vocals.
Conclusion
Mastering microphone techniques is like tending a delicate garden; your careful attention to proximity, angles, and plosive control cultivates the perfect sound. Each adjustment is a seed planted, shaping the clarity and warmth of your voice. When you listen closely and adapt, you’re nurturing a symphony where every detail blooms. Remember, your microphone is a mirror—reflecting your skill and care, transforming raw sound into a vibrant, mesmerizing expression.